
Using Custom Layers in Garden Planner
Below the design grid is the layers button (near the bottom middle of the design view). Clicking on the Layers button will show the layers window.
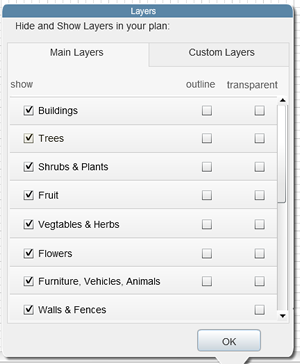 There are two sides to the layers window. The main layers section lets you hide or show different parts of your plan. This can be useful if you want to make adjustments to one part of the plan but find that other objects are getting in the way. eg: say you want to modify the paving in your plan but trees and flowers that appear on top of the paving are making it hard to adjust the shape of the paving. Then just hide the layers above the paving while you make the adjustments and then show them again when you are finished.
The Outline and Transparent check boxes allow you to set specific parts of your plan to display as just an outline or as transparent (see through). This can be useful if you want to be able to see objects that are under bigger objects - eg: see plants and flowers that sit under a large tree.
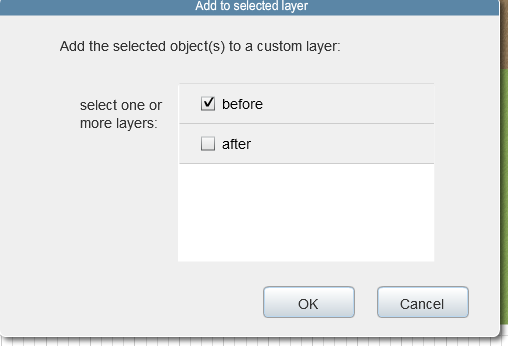
 The custom layers section allows you to create your own naming layers in your plan. For example you could create a layer called "Spring Only" and add bulbs that only flower in the spring into this layer. You can then select the bulbs on the plan and from the Selected Object menu choose Add to Custom Layer and add the bulbs to the Spring Only layer. This then allows you to turn on or off the Spring Only layer, effectively showing or hiding these plants.
Another option is that you could create a layer called Before and a layer called After. Add the objects in the current plan that you plan to remove into the before layer, add new items to be added to your garden in the after layer. Then switching on an off these layers will allow you to flick between the before and after stages of your plan.
A couple of important things to note. If you delete a custom layer only the layer name is removed. All plants and objects on that layer remain in the plan.
Also, the main layers are independent of the custom layers. So you can hide the trees using the options under main layers and this will work even if you have the trees also part of a custom layer.